Android TV Installation Guide
Initial setup
Google account
Generally, Android TV requires connecting the device with a Google account. You can create a specific account for your project, for example mycustomer.mycompany.signage@gmail.com.
On some devices, it is possible to skip this step. In that case, Google Play will not be available and installing applications will require connecting the device to a computer. More information in the section Install an application with ADB.
First start
Before starting the installation of Touchify on your Android TV player, a few steps are necessary to start the player. Begin by connecting the player to your screen and to power, then follow the on-screen instructions:
- Pair the remote control
- Select the interface language and region
- Skip the "Set up your TV quickly with your Android phone" step
- Connect the player to your Wi-Fi network
- Sign in with a Google account
- Accept the "Terms of Use"
- On the "Google Services" step:
- Uncheck "Use location"
- Uncheck "Help improve Android"
- Click "Accept"
- On the "Google Assistant" step, select "No, thanks"
- On the "Install other apps" step, uncheck "Install all the following apps", then "Continue"
- On the "Stay informed" step, select "No, thanks"
- On the "Select your subscriptions" step, click "Continue"
Install prerequisites
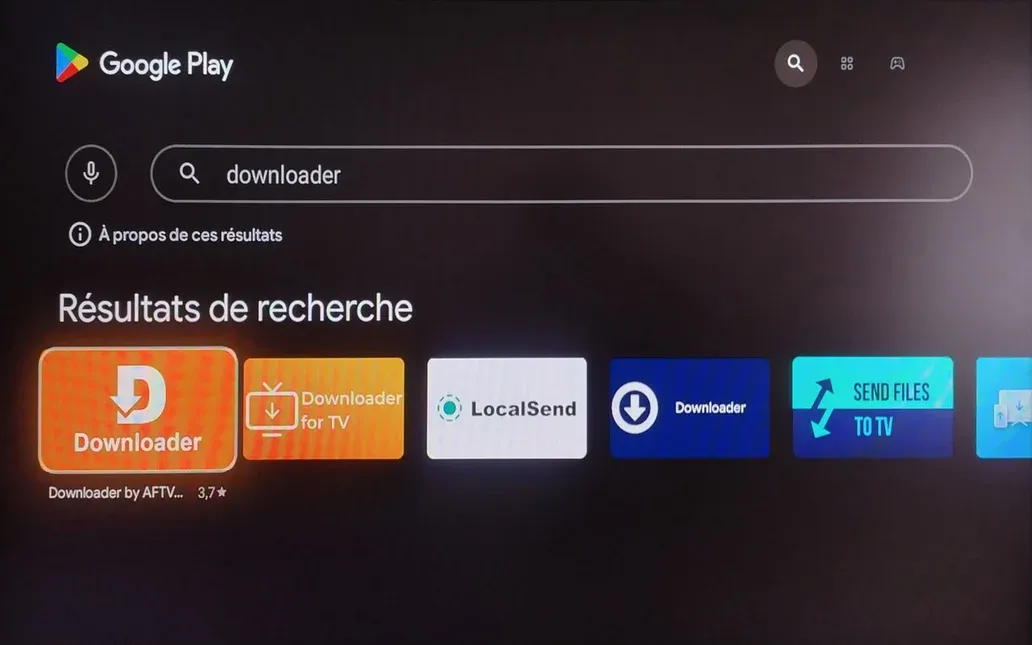
Install the Downloader app
- Open "Google Play"
- Search for "Downloader"
- Select "Downloader by AFTVnews"
- Click "Install"
Note: If Google Play is not available, use ADB to install Touchify directly. More information in the section Install an application with ADB.
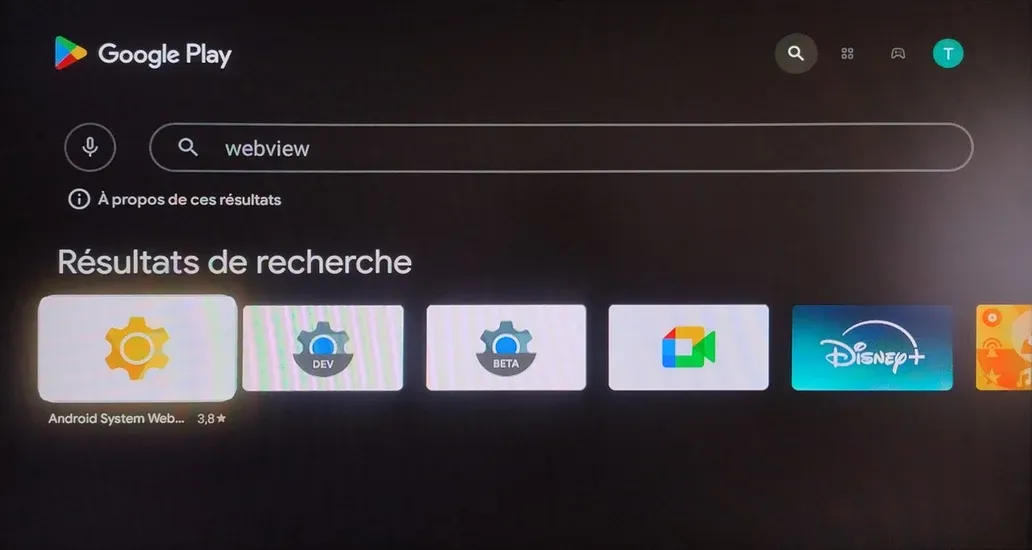
Update the webview
- Open "Google Play"
- Search for "webview"
- Select "Android System Webview"
- Click "Update"
Note: If Google Play is not available, use ADB to update the webview. More information in the section Install an application with ADB.
Configure the player
Update the system
- Go to the player settings (top right of the screen)
- Go to "Device Preferences" then "About"
- Click "System update"
- If an update is available, install it
Remove player restrictions
- Go to the player settings (top right of the screen)
- Go to "Device Preferences" then "About"
- Go to "Build"
- Click 7 times on "Build"
Change the device name
- Go to the player settings (top right of the screen)
- Go to "Device Preferences" then "About"
- Click on "Device name" then "Edit"
- Select "Enter a custom name"
- Enter an identifiable name (e.g. screen-client-1)
- Press "Enter" on the keyboard
Disable the screensaver
- Go to the player settings (top right of the screen)
- Go to "Device Preferences" then "Developer options"
- Enable "Stay awake"
- Click "Back" to return to the "Device Preferences" page
- Go to "Screen saver"
- In "Screen saver", select "Sleep"
- In "Put device to sleep", select "Never"
Remove applications
- Go to the player settings (top right of the screen)
- Go to "Apps"
- Select an app to remove
- Click "Uninstall" or "Disable"
Update applications
- Open "Google Play"
- Click the user icon at the top right of the screen
- Go to "Manage apps and games" then "Update"
- Click "Update all"
Allow Downloader to install applications
- Go to the player settings (top right of the screen)
- Go to "Apps" then "Security & restrictions" then "Unknown sources"
- Check "Downloader"
Disable recommendations and synchronization
- Go to the player settings (top right of the screen)
- Go to "Accounts & Sign-in"
- Select your account
- Uncheck "Autoplay trailers"
- Check "Apps only" and click "Enable"
- Uncheck synchronizations for "Calendar", "Contacts", and "Google Play Movies & TV"
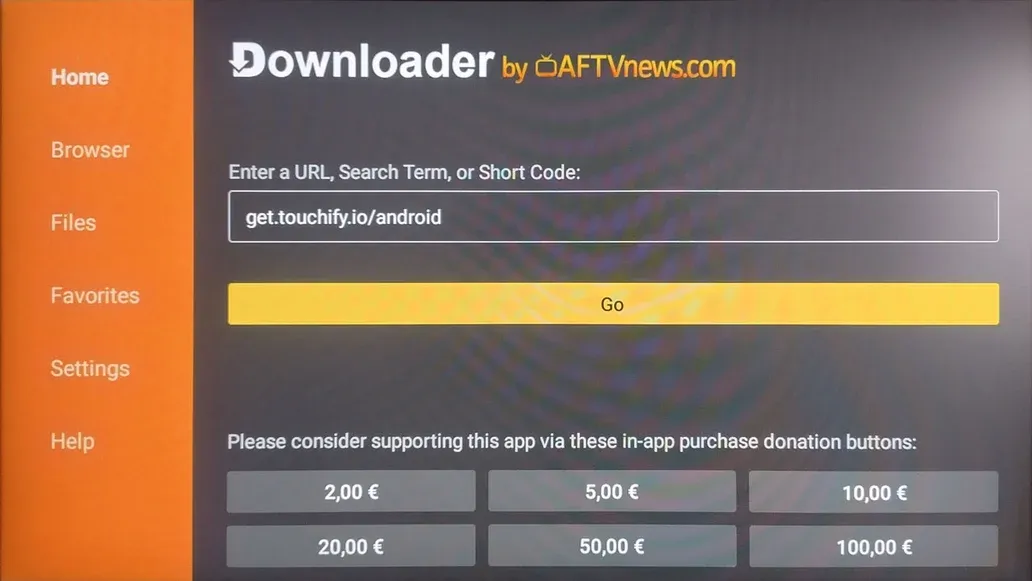
Install Touchify Player
On the home screen:
- Open "Downloader"
- Allow "Downloader" to access photos, media, and files on your device
- In the address bar, enter the following URL: get.touchify.io/android
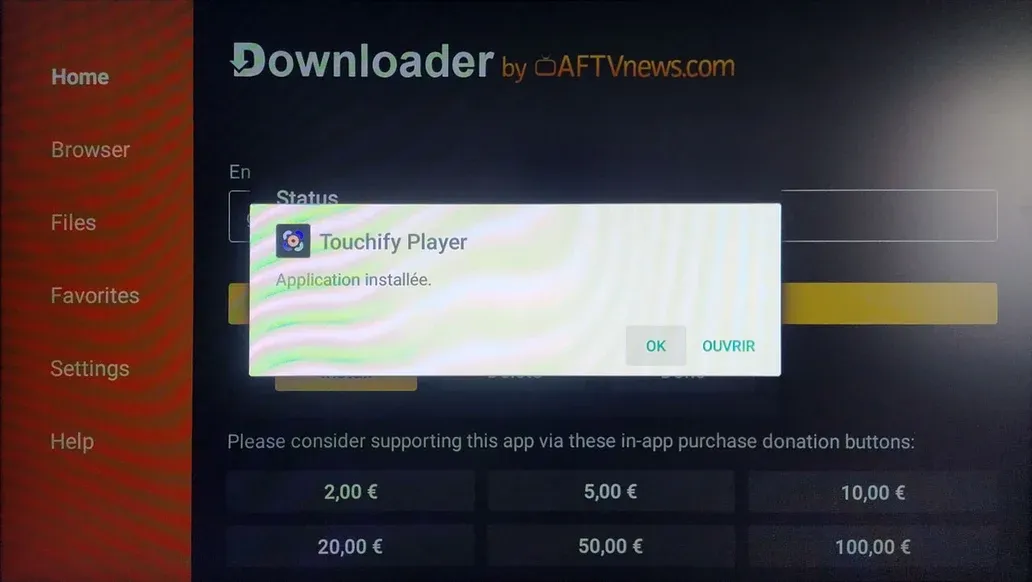
- After downloading, a confirmation window appears, click "Install"
- After installation, click "OK" (do not open the app yet)
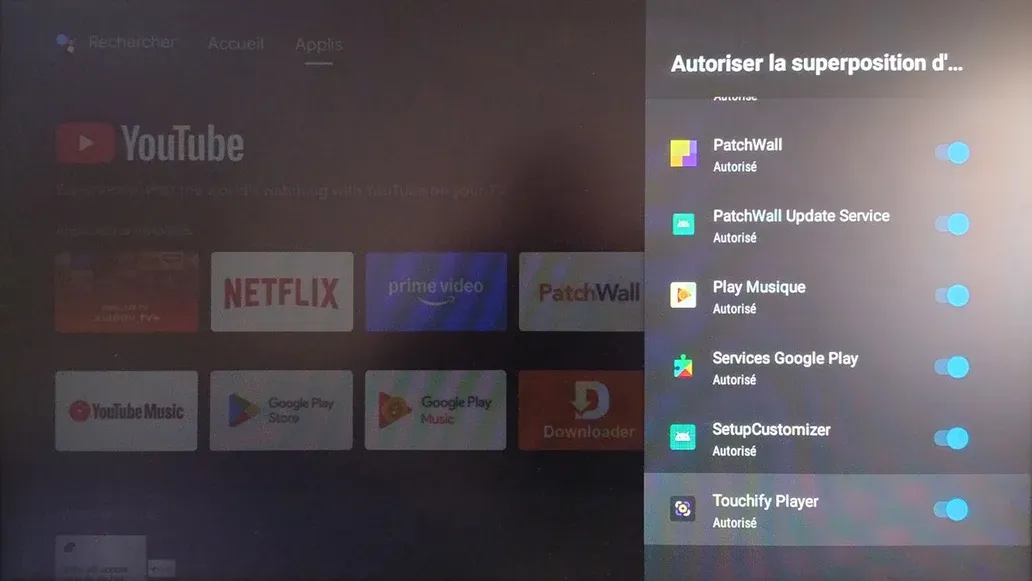
Grant permissions to Touchify Player
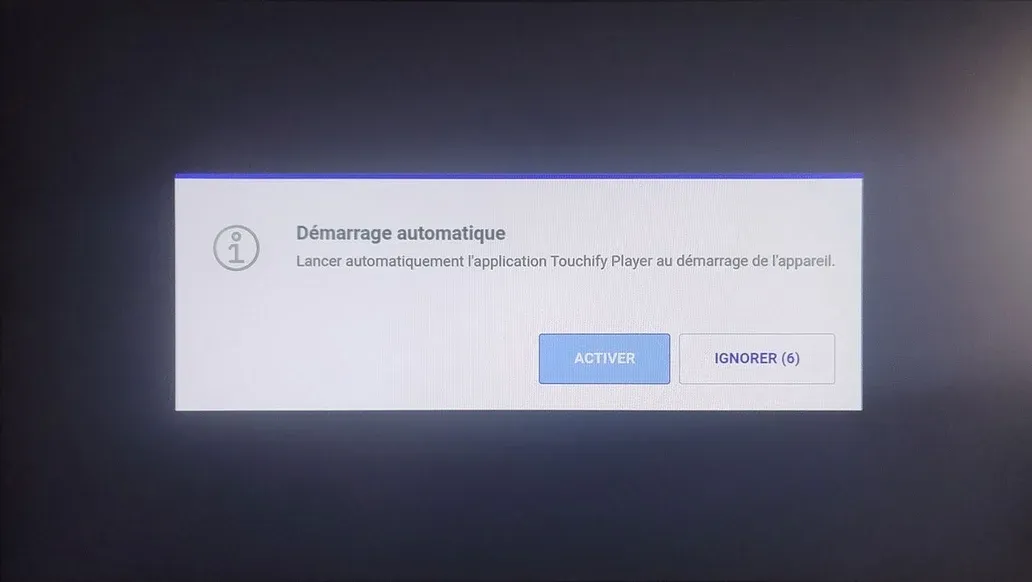
Allow the app to launch at startup
- Go to the player settings (top right of the screen)
- Go to "Apps", then "Special app access", then "Display over other apps"
- Enable "Touchify Player"
- It is recommended to disable all other apps
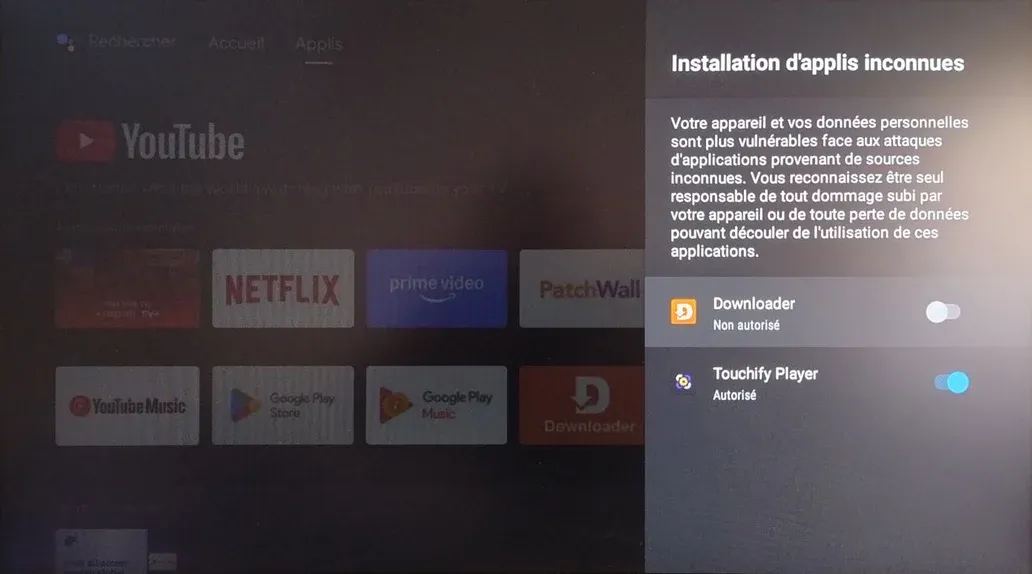
Allow the app to update
- Go back to the "Apps" menu
- Go to "Security & restrictions" then "Unknown sources"
- Enable "Touchify Player"
- Optionally, disable "Downloader"
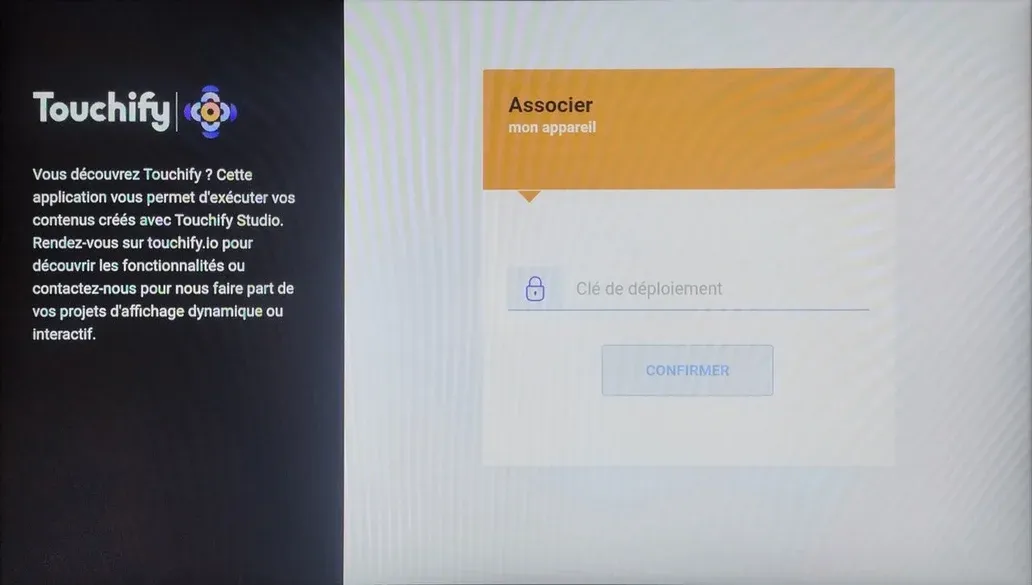
Link the screen to your account
From the home screen:
- Open "Touchify Player"
- Enter your deployment key (see Introduction to Touchify Publisher)
Use ADB to install an application (optional)
Where to find ADB?
If you have installed the Android development tools on your computer, ADB is located in the platform-tools folder of the SDK, for example AppData/Local/Android/Sdk/platform-tools.
You can also download ADB from Google Android Developers.
Where to find applications?
Several websites list Android applications, for example APK Mirror.
Search for an application and select the latest version that matches your Android version.
The Touchify Player application is available on our website:
Download Touchify PlayerInstall an application
In the command line, in the folder containing ADB:
adb install -r "PATH\TO\FILE\package.apk"
Configure an advanced kiosk mode (optional)
Install the ADB TV app
From Google Play, search for the ADB TV app and install it.
If Google Play is not available, install the app using ADB.
Set Touchify as the Home app
Run the following command to set Touchify as the Home app
## From a command line
adb shell pm set-home-activity co.touchify.player/co.touchify.cordova.plugin.launcher.LauncherActivity

## From the ADB TV console
pm set-home-activity co.touchify.player/co.touchify.cordova.plugin.launcher.LauncherActivity
Run the following command to disable the default home application:
## From a command line
adb shell pm disable-user --user 0 com.google.android.tvlauncher

## From the ADB TV console
pm disable-user --user 0 com.google.android.tvlauncher
Restore the default home screen
Run the following commands to restore the default home screen:
## From a command line
adb shell pm enable --user 0 com.google.android.tvlauncher
adb shell pm set-home-activity com.google.android.tvlauncher/.MainActivity

## From the ADB TV console
pm enable --user 0 com.google.android.tvlauncher
pm set-home-activity com.google.android.tvlauncher/.MainActivity