Create an API key for payment terminals in Stripe
Introduction
Touchify allows you to link your Stripe account to collect payments via Stripe terminals on touch kiosks.
Let's examine your account configuration to get a valid and secure API key.
Connect to your Stripe account
To begin, you need to go to the Stripe administration portal: https://dashboard.stripe.com
In your account, you need to navigate to the Developers section by clicking the link at the top right of your screen.
In the Developers section, click on the API keys tab.
Create a restricted API key
To begin, click the Create restricted key button. In the confirmation popup, choose Provide this key to another website then click Continue.

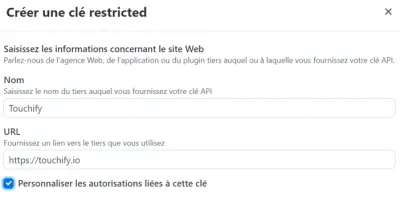
In the form, enter a name for your key (for example: Touchify), enter our website URL: https://touchify.io, then check the Customize permissions for this key box. Then click Continue to customize your permissions.
We will now configure the most limited set of permissions possible:
- In the Core Resources section, click None to disable all permissions. Then click Write on the PaymentIntents resource.
- In the Checkout Resources section, click None.
- In the Billing Resources section, click None.
- In the Connect Resources section, click None.
- In the Orders Resources section, click None.
- In the Issuing Resources section, click None.
- In the Reporting Resources section, click None.
- In the Webhooks Resources section, click Write.
- In the Stripe CLI Resources section, click None.
- In the All Payment Links Resources section, click None.
- In the All Terminal Resources section, click Write.
- In the Tax section, click None.
- In the Radar section, click None.
- In the All Climate Resources section, click None.
Finally, click Create key to generate your secret key. You will then find your secret key on the API keys page.
You can click Reveal secret key to display the key and click on it to copy it to your clipboard.